Monday, January 30, 2012

Teddy Bear Still Life

Playing with Still Life........

1st Attempt:

Handbook sketchbook


The Steps I Took:

1)  First thing was coming up with a main subject.  I love teddy bears so that was my first choice.  Beginning this sketch in my Handbook, I used the basic shapes concept with circles, ovals, and rectangles lightly with the side of my pencil.  After I laid down the main shapes, I defined the edges as shown.  You may or may not see the light shapes underneath the finished lines.


2)  Next I needed to decide on what to place with him.  First thought was maybe a gift box but chose a gift bag instead (as I thought about what I used over Christmas since I don't care to wrap any more).


3)  At this point I felt this needed at least one more item so as I looked around trying to decide, my eyes settled on a candle I had sitting on a shelf.


4)  OK..........now that I have a simple still life set-up I like, I try to decide on how I want to go about painting this.  What colors to use.  What background (if any) or if I just want this as a vignette or illustration.

To play with possibilities, I print this out and try a few color experiments.  First I try a value sketch with a dark bag and the teddy bear lighter since that will be my main focal point.  The painted examples didn't quite follow the value scale but instead turned out opposite using a light value color.  The third is what I decide to go with.


5)  Ending Results: Chose to use Raw Sienna, Bt Sienna, Sap Green, Quin Rose, Aureolin, and Cerulean Blue

This didn't quite work out as I hoped for for a few reasons.

a)  The paper didn't want to cooperate using wet in wet.  The pigment didn't run and merge and ending results show streaks (particularly in the bag).

b)  In error I used water soluble graphite for the pencil sketch (not thinking) which bled when applying the watercolor.

c)  As I study this on screen, I see yet another area of disappointment - the bear's right arm didn't turn out very well as it's too stiff - too straight.

On a positive note - I do like the blossom in the head.  That gave a little texture to suggest a bit of fur.  And biggest positive working this exercise - I learned a few things :-)


Sunday, January 29, 2012

Junco Sketches

These were done in the Handbook.  The paper surface is different on the back of the pages.....smoother in comparison to the front sides. 

Personally, I find this to be a plus as it gives a different look to the results.  The back side allows for more defined detail whereas the front provides a nice textured look without a lot of effort on one's part.  Love working with the side of the pencil lead!

Saturday, January 28, 2012

Junco in the Snow

During the winter months we have several dozen juncos around our feeding station.  They are mostly seen on the ground along with doves picking up seed dropped but occasionally you might see one up on the flat feeders.

Completed in my handmade journal using Fabriano Artistico 140lb Cold paper; Cerulean Blue, Fr Ultra, Bt Sienna and Bt Umber, and Raw Sienna; #10 Round; wet in wet by applying water first and then dropping color in with brush allowing pigment to spread.

Friday, January 27, 2012

Sketching Frenzy

I seem to flow like the tide where my artwork is concerned; only my cycles are much more spread out.  I've been in a real sketching frenzy lately.  One of my personal New Year resolutions was to paint or sketch something each day or at the very least once a week.  I'm not real disciplined and the New Year started out slow for me.  Well here I am completing one sketch after another, so while the mood is with me, I'll just go with the flow and enjoy while I can.  I'm sure I'll hit another low tide before too long (hopefully not as long between low/high tides.)

The Christmas Cactus bloom is a flower I've so wanted to draw and paint for years.  Each year it blooms, I take all sorts of photos with the intent to do something.  And each year I would chicken out because it seemed too complicated and intimidating.

The various bud/flowering stages really grabbed my attention this year so instead of taking pictures, I forced myself to attempt sketching what I saw.

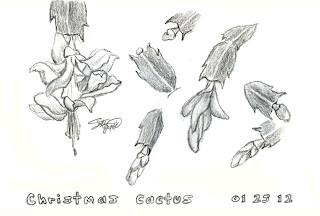
This first sheet took awhile to complete leaving the full flower last to attempt.  That took me forever and I kept getting lost with all the petals twisting and pointing in different directions.  When complete, I told myself I'd not be painting this or even attempting to sketch again because it was too mind boggling.  I did feel great upon completion.......FINALLY I managed capturing that flower (at least once) !!!!

Cactus Flower sketches done in Handbook


Next day the plant kept calling me to it.  Either I'm a glutton for punishment or I was feeling a bit more confident and up for the challenge to attempt it again.   In either case, I decided to work with one flower turning the pot so I could work with the different views.  Now mind you, I chose one not completely open so maybe that helped.

I found with this session not to be as tedious and I managed to fill the page in a much shorter period of time.  Not laboring over any portion as I did the previous day.

With this sheet, my goal was to capture shape/form rather than get into shading.  I felt really good with this one.  Maybe I was in a better frame of mind mentally for the challenge - hard to say.  :-)


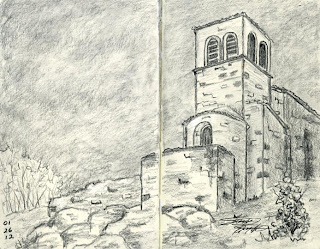
I've been to England three times and one of the landscape elements that I absolutely love viewing are the many castles we just don't see here in the States.  I'm not one for drawing or painting architecture but castles, huts, or even old barns are an exception in my book.

This is a practice for a possible painting sometime in the future.  It's simple design is what captured my attention with this one.  I love the round portion of the castle worked in with the square and rectangular shapes.

Moleskine Sketchbook - 3x5" book (closed)


This next sketch was done in less than 10 minutes while sitting and waiting for my granddaughters bus.  Across from where I was parked was this stream with all sorts of landscape debris.  My goal was to quickly capture what I could in the time I had before the bus arrived.  Definitely not something I'd frame and hang on the wall but it was definitely fun to do.

Moleskine Sketchbook - 3x5"


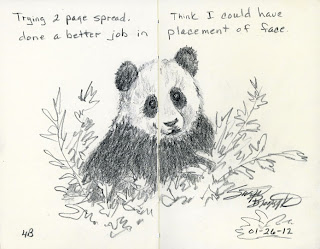
Wildlife is a favorite subject I like to sketch/paint.  Pandas, to me, are absolutely adorable.
This was the first 2-page journal spread I've attempted.  (sketches are out of order).  I've seen so many people doing this and so I finally decided to give it a try.  At first I felt I positioned this guy all wrong for being spread over 2 pages but now it doesn't seem so bad.  I think it actually works OK.

Moleskine Sketchbook - 3x5"


From photo that had three buildings and it was late at night so I just did the smaller of the three.

Moleskine Sketchbook - 3x5"


Another quick sketch practicing where I use the side of the pencil to quickly rough in the shapes and then go back and define with point.

Moleskine Sketchbook - 3x5"


Added Note:

Normally I draw and paint on a small scale - 4 x 6 or 5 x 7 surface.  You'd think that working in a 3x5" book would be right up my ally; but it wasn't at first.  I found this small size rather awkward to work in.  Now after several sketches, it's not so bad.

All sketches are using a Derwent Watersoluble pencil - 4B and/or 8B (most often I grab the 4B and use it from start to finish)

Don't you just love how scanners and cameras have a mind of their own?  The majority of these sketches were done in the same book - same paper and yet the digital results from scanning them ended with different tones or coloring.   Funny part is that I never changed any of the settings.............thought just occurred to me..........I wonder if the difference is in whether or not the scanner lid is open/closed or placement of the book on the glass bed?  Maybe amount of light coming in along the edges????

Thursday, January 26, 2012

Mouse in the House - Graphite

This was done in the Handbook sketchbook with a Med Wash Derwent graphite pencil (4B)

I've come to love holding the pencil where the side of the lead is what comes in contact with the paper as I get my form down.  Especially with subjects I might not feel real confident in trying to capture.  Then I go back with the point to  give more definition in detail. 

Using the side of the lead with light pressure not only makes it easy to correct, it gives the sketched subject a fuzzy look for added dimension (hoping I'm using the proper word for what I'm trying to convey).

This is either a field mouse or deer mouse.  My son is referring to them as field mice.  I'll have to do some research to find out which, if any difference. 

Wednesday, January 25, 2012

Chocolate Bunny and Eggs - Watercolor and Experiment

Have no clue why I'm on this subject right now as Easter is months away; however, this is what struck me to paint so I did.  I never know from day to day what mood I'll be in or what subject tickles my fancy to draw or paint...I just go with the flow.

Another Easter Card Idea....


Also, I wanted to share an experiment I did with this particular painting.  Pen and Ink intrigues me and I love what I see from other artists.  Here I was thinking how hard can it be but then I found myself a bit unsure.  What type pen and ink?  What color(s)?  Do I use black ink or brown or even maybe match the ink to color of surrounding areas.  Do I outline everything or do I outline only portions? 

Asking other people how they work their pen and ink, I learned it all depends on the individual, their mood or frame of mind at the time, their preferences, subject matter, etc.  That there is no true right or wrong way of doing this and people can be just as creative with pen and ink as with any other medium.

After the feedback I received, I decided to give it a try but afraid I would mess my painting up.  It was suggested to me to print a scan of  my painting and experiment on printed sheet. That's exactly what I did........I scanned and printed so I could try black, brown, completely outlined and partially outlined to see what I personally liked.

All methods look good but my own personal preference (at least with this particular painting) is partially inking leaving highlighted areas free of ink so I have that lost and found look tying the subject in with the background.  And, I found I prefer the brown ink with this particular piece.  It's softer giving a more subtle look.  Top right example is my #1 choice.

This was a fun experiment and I definitely learned a lot.

Tuesday, January 24, 2012

Baby Chick - Water Soluble Graphite

This started out to be a gesture sketch of a baby chick.  You might say I got a bit carried away and it ended up more like a full blown sketch.

A Derwent Dark Wash water soluble pencil was used (8B) in The Handbook sketchbook.  I sketched with the side of the lead rather than the point for most of it and then the point for final detail.  A waterbrush was used for shading.

Monday, January 23, 2012

Totally Out of It

Graphite on Copier Paper

This is from a photo taken early one morning after a bad night of sleep.  He was totally out of it looking rather scraggly and rough.

I still need practice in depicting wrinkles and creases in skin but am thrilled it turned out as it did.

Working this I was hoping for various textures and directional strokes for added interest.  Some areas smudged, some raw pencil work.  I found the way I did the shading in the face helped to depict just how rough he was feeling.  I could have used a smooth shading but didn't think it would give me that same overall feeling.

The "thing" off to the right (as you view it) is a feather shaped earring (he's part American Indian).

Sunday, January 22, 2012

Don't Go

I was practicing this sketch on copier paper using pen and ink for a possible painting idea.  Took a Tombow marker pen and went around in a few areas and shaded with a waterbrush.  Next thing I knew, I was applying light washes of watercolor and ended up with this.

Colors used were:  Raw Sienna, Fr Ultramarine, Cobalt Blue, and Quin Rose.

Graphite/Ink and Wash Combo Continued

This is the completed sheet I started last night using water soluble graphite and Tombow marker pen and wash.

Tombow black (N15) and Derwent Dark Wash graphite (8B)

Graphite/Ink and Wash Combo

This started out to be a graphite sketch using a water soluble pencil (Derwent Dark Wash 8B).  Decided to shade using a damp waterbrush and then finalized with some detailing using a Tombow marker pen.   I like the combination of softness achieved with wash over the graphite as well as dry areas left that show the texture of the dry graphite (not sure the image is large enough for viewers to see this).

Saturday, January 21, 2012

Re-visiting Paper Surface, Color, and Technique

Whenever I go for periods of time not painting, I always feel lost like I'm not quite sure what to do or can't remember what I did to obtain a certain look, etc.  So for me I feel the desire to step back again to the beginning.  I need to re-familiarize  myself with painting surfaces, paint consistencies, how pigments might react with one another..... and so on.

Here is a play-sheet of mixing color wet on dry and wet on wet using The Langton watercolor paper.

Top left - Wet on dry mixing color on the paper.  My washes were too thick so the results turned out darker than I care for with the subject painted.  French Ultra, Perm Aliz, Sap Green, and Hansa Yellow were used.

Top right - Playing with two browns (Bt Sienna and Bt Umber) for depicting chocolate but added just a touch of Paynes Gray to darken a few areas.

Bottom right - Wet in wet first applying water to the surface and dropping in pigment.  I love the unpredictable results!  These definitely turned out more to my liking.  Used Sap Green, Cerulean Blue (love this color!!), and Quin Rose.

A possible Easter Card idea :-)

Friday, January 20, 2012

More Doodling - Ink and Wash

Yesterday our cable went down and I spent time playing with color pigments for painting chocolate.  Results of that play time will be shared in a later post. 

In addition, I started another sheet of sketches with my brown Tombow marker, which I finished this evening while watching a little TV. 

Wednesday, January 18, 2012

Doodling with Ink and Wash

Been awhile since I've done any of these.  Decided I wanted to try out the brown Tombow marker pen for a change.  It doesn't bleed quite like the Black does but I still like the results.

These are just quick loose doodles, which I find to be quite relaxing and fun to do....provided I do so on this paper.  I find using lined tablet paper helps me work loose and spontaneous.  It's actually a mind game for me considering I can be quite a perfectionist which often results in over-working.    Should I use good paper, my brain says I have to take greater care often spending too much time with minute detail and over-working a piece.   This is my personal solution in freeing me from that tendency :-)

Not all lined tablet paper reacts the same.  I find I like the Staples brand best.  Something to do with the thickness of paper and the finish (at least working with the Tombow Dual Marker Brushes).  Once I have at least 50 to 100 completed sheets, I bind the pages into a notebook.  I have my granddaughters wanting to do the same - saving their individual art pieces they've created on paper and grandma binding later when there are enough pages to put together for them.

Tuesday, January 17, 2012

Peanut Butter Blossoms in Watercolor

A quick or loose watercolor rendering of the Peanut Butter Blossom cookies I sketched a couple of days ago.  This was completed for a forum cameo challenge mentioned in my earlier post.


Note about comment on journal page.............if truth be known, I'm craving these cookies now that I've sketched and painted them.  My husband says "go paint some carrot sticks".................HA HA HA :-/

UPDATED Post - I wasn't happy with the cookie in the back so I added some brown to it.

Sunday, January 15, 2012

First Accomplishment for the New Year - My Favorite Cookie

As a forum workshop challenge for January, we were to paint something sweet in watercolor.  Before attempting to do so with brush and paint, I decided to sketch one of my favorite type of cookies.  A cookie I look forward to every Christmas!!